Tuesday, June 30, 2015

Candied Orange Slices in Spiced Chocolate

Father's Day was not too long ago and I was contemplating what to give my dad. He's always loved chocolate and fruit; and since cooking happens to be my specialty, I  decided to make him something special! Here are the instructions for making delicious candied orange slices dipped in spiced chili chocolate. (NOTE: these take about 1-2 days to dry out.)

You will need:
Organic oranges (I used about 2 & 1/2 small oranges.)
1 1/2 cups granulated sugar + extra for coating
1 cup water
Chocolate (I used semi-sweet chocolate baking chips.)
Powdered chili
Small or medium pot (depending on how many orange slices you're making.)

A note: I doubled the sugar syrup because I had a lot of orange slices to candy.

To start:
1. Wash the orange(s) thoroughly with warm water and dry. Slice your orange(s) into 1/4 inch discs. You can even cut these circles in half if you want smaller candies.
2. Next, you're going to blanch these slices. Put them in a pot of cold water and bring it to a boil. Strain them using a fine mesh sieve and put them aside. Repeat the blanching process, except this time, put the slices into an ice bath when they're done.
3. Now its time to make the sugar syrup! Put the sugar and water into the pot and set it on medium heat and stir until the sugar is dissolved. Once the syrup begins to bubble, stop stirring it. 
4. Put the oranges in the syrup and let them candy uncovered for approximately 1 hour.
5. After 1 hour, place the oranges on a cooling rack for about 15-20 minutes. Once this time has elapsed, coat both sides of the slices in sugar and place them back on the rack. 
6. Let the slices dry out for 1-2 days (or until you just can't stand to wait anymore.) 
7.Melt your chocolate in a double boiler or the microwave. I always use the microwave to avoid my chocolate seizing. Stir in a pinch of chili powder and begin dipping! 
8. place the orange slices on a cookie sheet lined with wax paper and refrigerate for 1-2 hours.


I really loved making these delicious angels! The chocolate with the chili and the citrus was such an amazing combination! You could even substitute oranges for grapefruit or blood oranges! I used World Markets autumn colored single serve pie boxes to wrap these beauties up! I hope you enjoy making these and have fun sharing them! 


Peace and love. XXX.

Monday, June 1, 2015

My Favorite Things from MAY

The spring has been crazy and May has been the craziest month so far. I haven't blogged hardly at all lately so I'll re-cap this month with my favorite things that came about during it!


I absolutely love this dress! I needed something to wear for an event the next day and wanted something classic and floral. Goodwill had already closed, so I was hunting at JCP for the perfect frock and discovered this gem! I wore this floral shift dress with an old pair of my mom's shoes (which she will never see again.) I Painted my toes orange because it went too perfectly with the flowers on the dress. For the accessories, I mixed metals: gold elephant bracelet, copper zodiac sign necklace, gold arrow earrings, and silver rings! All in all, this one my favorite outfits (this month!)


Ahhhhh, baby pears. They were just begging to be poached! This month I poached four pears in Chardonnay and Ginger Ale! I added a lemon peel, cinnamon stick, and 3 whole cloves to the mixture along with a bit of sugar. When the pears were done poaching I fished them (and all the spices) out of the pot and let the liquid reduce. Meanwhile I candied some pecans by dipping the tops in melted butter and then brown sugar. I used my cooking torch to melt the sugars. The yellow stuff in this pic is just cold vanilla custard spread out on half of the plate. Once the liquids had reduced to a kind of thin syrup, I drizzled it on the other half of the plate. This dessert was heaveeeeeen and my best creation this month!
This month I had a pickup installed in my guitar and I was so nervous about it. I was worried that look of my beautiful acoustic Takamine would be distorted. Luckily the guy at my local music shop said that nothing would show on the outside of the guitar and he could put the dials inside! She came back beautiful, so the next step was to find an amp. I stopped at my friends pawn shop to look for an amplifier and they had a Marshall Mini Stack in great condition! Not only did it have a great and clean sound, but they had it priced at $150! Normally these run $400-$450. This good investment in May will benefit me forever (or until I accidentally blow the amp.) The moral of this story? Pawn shops and thrift stores before retail!


I was at World Market about a week ago going absolutely crazy buying coffee and cookies and such when I came across this organic sparkling drink. I had the Lemon Flower Sipp soda and it had such an interesting flavor. It was lemony and grassy and floral and just really really delicious. If your looking for something refreshing I think this is it! I need to get back around to World Market just for these sodas! Also, Bon Appetit Magazine was especially wonderful this month of May. It focused on travel, and while I'm missing my sister who's exploring Italy now, it was a perfect read. 


I was having lunch with a friend this month, and she suggested a place called "Slim Chickens." As I was looking at the menu, I realized that I had never had chicken and waffles and couldn't quite call myself a real southerner until I had. The fact that the waffles were shaped like Texas was the deciding factor. I actually (much to my surprise) really liked the chicken and waffles! There was no sauce that came with them so I just used ketchup, which was not bad, but I think maple syrup would've been better. This was one of the best discoveries of May for me!


Peace and love. XXX

Saturday, January 24, 2015

I'M CUTTING OUT SUGAR!... starting tomorrow.

I've had this brilliant idea to cut out refined sugars from my diet. As I'm writing this, though, I'm eating a bowl of icecream and last night I took it upon myself to make meringue cookies. This "reformed diet" idea may need to wait for a bit. I think healthy eating is something I'm definitely going to start incorporating into my life more, but I sat down with the February edition of Southern Living Magazine only to stop myself on the first page when I saw a recipe for cotton candy meringues! Making these little sweets was the best and worst decision of the week.

To make these, you'll need:
4 egg whites
1/4 tsp. cream of tartar
1 cup sugar
2 tsp. cornstarch
1 tsp. white vinegar
1&1/2 tsp. vanilla extract
OPTIONAL food coloring

To start:
1. Pre-heat oven to 250 F. Beat the egg whites with the cream of tartar until stiff peaks form.
2. Mix the sugar and cornstarch together, then gradually beat the mixture into the egg yolks.
3. With a rubber spatula, gently fold the vinegar and vanilla into the egg white mixture.
4. On a cookie sheet lined with parchment, place dollops of the mixture. I chose to pipe mine out with a bag and Wilton's 1M piping tip.
5. Bake for an 1 hour and 15 minutes. Turn the oven off, but leave the pan in for 1&1/2 hours. The meringues will be good up to five days in an airtight container.

I separated my batter into three different bowls and added food coloring to them. In one bowl, 2 drops red & 1 drop blue. In the second bowl, I added 2 blue, 1 green and 1 yellow. In the last bowl, i added 2 red and 2 yellow.  I didn't fully fold in the coloring so it was a little stripey! I layered the different colored mixtures in the piping bag so they would come out all swirly and pretty!

These would be really nice to serve at a wedding or baby shower. You can add practically any flavoring or coloring. They are just so fun. They look really sweet and dainty and taste similar to Lucky Charms marshmallows. If you're having less sugar (starting tomorrow,) like I am, I highly recommend that you binge a little on these first!


Peace and love. XXX.

Thursday, January 22, 2015

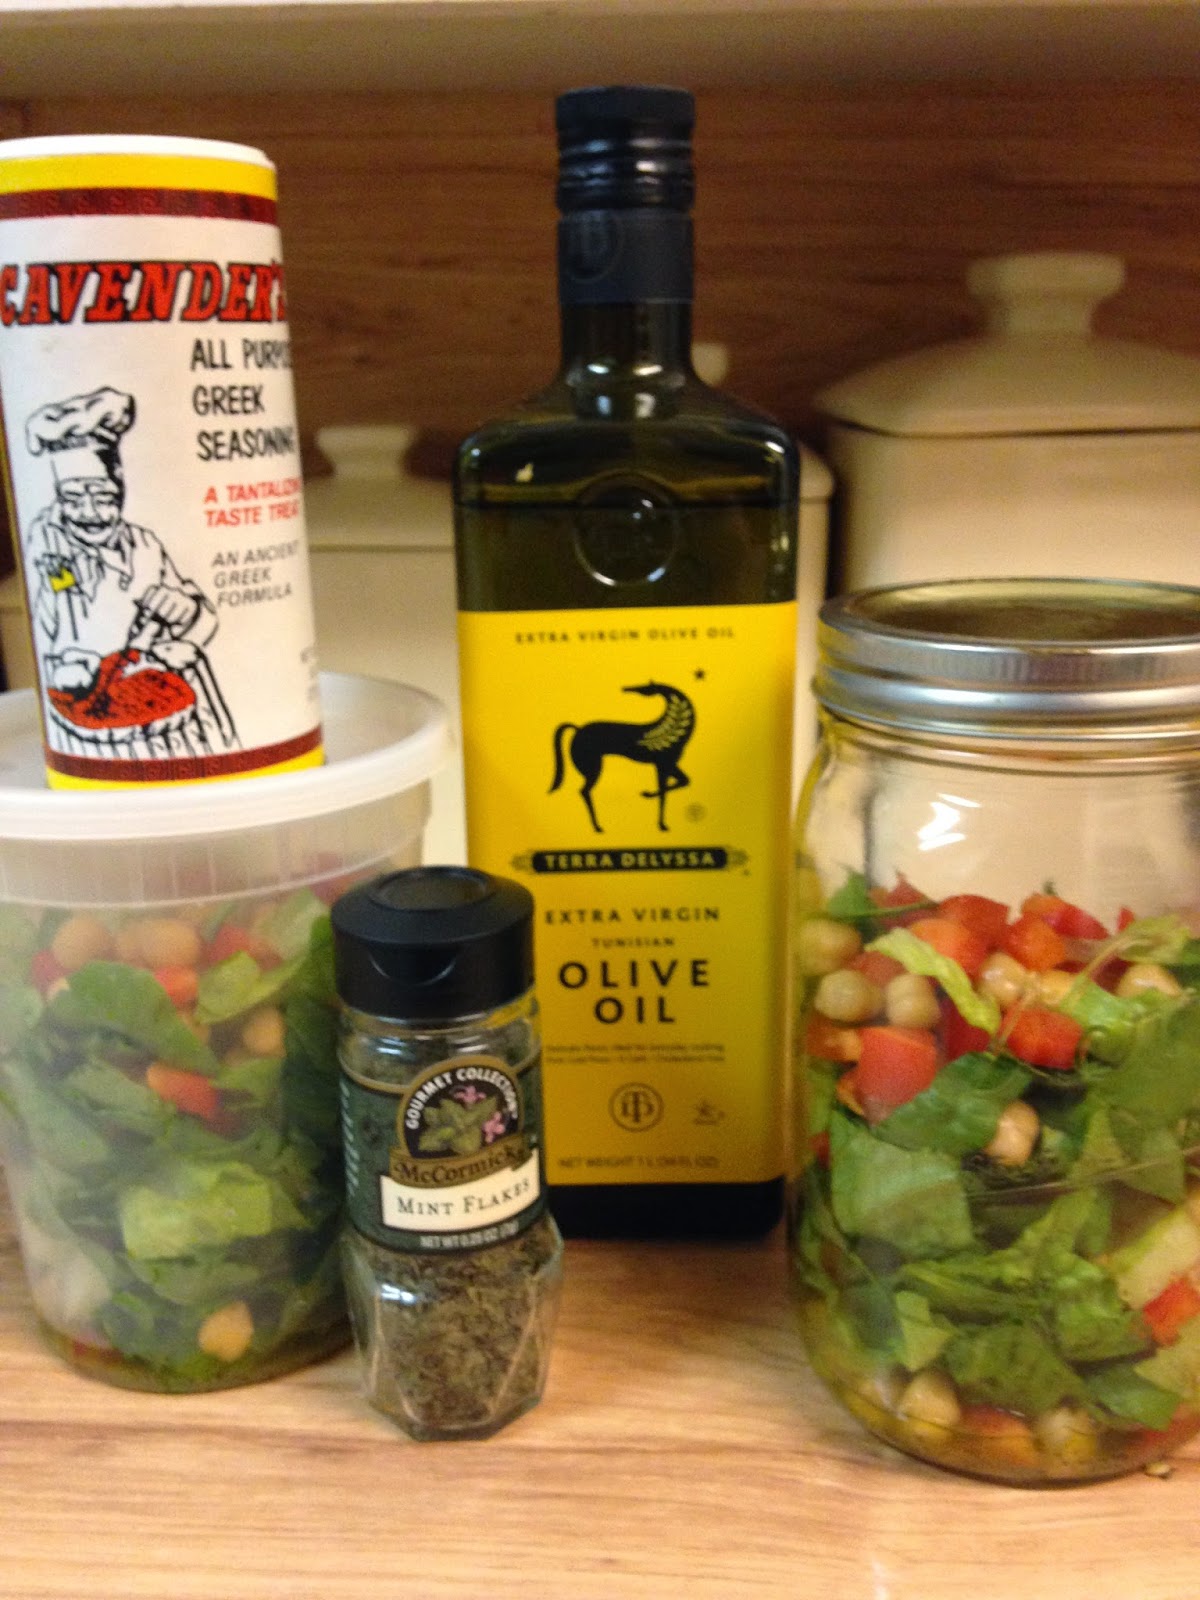
Mason Jar Salad

I have all day classes on Tuesdays and Thursdays, so a midday meal is very necessary. At my campus, we have a Chik-Fil-A, Subway, and a cafeteria. First of all, I don't like spending a lot of money on lunch while I'm at school. Second of all, I don't want any of that freshman fifteen! I get a lot of exercise trekking around campus and I feel like I'm sabotaging that by having a huge fried meal in the middle of my day. I've been trying to come up some healthy lunch options to bring with me to school! Today, I had a chickpea and red bell pepper Greek salad.

Makes 2 servings

You will need:
1/2 Red bell pepper
2/3 cup chickpeas (garbanzo beans)
6 leaves of Romaine lettuce
1/4 cup olive oil
3 tbsp. lemon juice
1 tsp. of Greek seasoning
Dash of dried mint

To start:
1. Wash and dry the lettuce leaves and chop them into small pieces. Clean the pepper, being sure to remove all the seeds. Dice up the pepper and toss it in a bowl with the drained chickpeas and lettuce.
2. Mix together the olive oil, lemon juice, mint, and seasoning. If you feel like it needs more of a certain ingredient just go for it! Make it how you like.
3. Evenly distribute the dressing in the bottom of two large mason jars or Tupperware containers. Put the vegetable mix in on top of the dressing, but don't mix it. You can shake up the jar when your ready to eat it and the leaves don't get soggy while it sits!


If you don't like chickpeas or red bell peppers you can substitute them for literally anything else. There's more than one way to skin a cat and there's definitely more than one way to make a salad. You could even substitute the lettuce for spinach or kale. I just wanted to show you a fun and healthy lunch option which is good on the go! Greek yogurt is my one true love and it just made sense to pair it with my Greek salad! 

Enjoy coming up with fun alternatives to this! I look forward to sharing some more "clean eats" with you!

Peace and love. XXX.

Monday, January 12, 2015

This Post is Brought to You by Gingerbread

To all the people who say gingerbread is for Christmas time only, I say gingerbread knows no bounds.  Here's the recipe:

2 & 1/3 cups all purpose flour
2 tsp. baking soda
1 tsp. ground cinnamon
1/2 tsp. salt
1/2 tsp. ground ginger
1/4 tsp. ground cloves
3/4 cup softened butter
4 tbsp. molasses 
1 large egg
1/3 cup brown sugar

1. Pre-heat oven to 325 F and line a baking sheet with parchment.
2. Mix the first 6 ingredients in a bowl. In a separate large bowl, cream the butter, egg, molasses and sugar until smooth. 
3. Fold the dry mixture into the wet mixture 1/3 at a time.
4. On a clean, dry surface, roll out the dough to about 1/2 inch thickness and cut out your shapes.
5. Transfer the shapes to the baking sheet and bake for 6-7 minutes. 

I like to frost mine with white chocolate ganache (white chocolate melted with heavy cream,) but you can frost them with anything or leave them naked. What's especially fun is wrapping up these little beauties! I found this precious wax paper at Michael's craft store that I used with washi tape from Target. If you're feeling like you need to get a Texas shaped cookie cutter (and you should feel that way,) you can find that here.

If you're a home fragrance kind of person World Market is the place to go. I went there the other day and upon seeing incense and candles, I was throwing my money at it like it had no value to me. I had to remind myself that I didn't need 16 candles or 12 packages of incense.  I bought a Moroccan Spice candle along with some Frangipani (plumeria) and Herb de Provence incense. When I first started using incense I had no idea what I was doing and I don't want you to be in the same boat.

First, you'll need an incense holder; they're fireproof and keep ashes from getting all over surfaces. There's a small hole at the end of the holder for the incense to go into. Light the incense at the thick end of the stick and let it burn for a few seconds. Blow out the flame and the incense should be glowing. It's simple to do and and just really calming.

Gingerbread and incense is not a traditional pairing, it's also not a bad one.

Peace and love. XXX.


Thursday, January 8, 2015

Sugary Rings of Sweet Joy

School starts back on the 13th and I'm trying to get aaaaallll the baking out of my system.  I received a doughnut pan as a Christmas gift and, oh my lanta, I've been itching to use it.  Of course you can always make doughnuts in a big pot of sizzling oil, I like mine baked.  Yesterday I made cinnamon sugar doughnuts and today was all about chocolate. You really need a doughnut pan to make these, otherwise they'll just be "buns."

The basic recipe is the same for both doughnuts: the only difference is in the topping.

For the cinnamon doughnuts, I melted two tablespoons of butter and brushed it over one side of the doughnuts with a silicone pastry brush.  I mixed 1/4 cup granulated sugar with a tablespoon of ground cinnamon and dipped the wet side of the doughnuts in to coat them. I also substituted granulated sugar for brown, and white vinegar for apple cider vinegar.


For the chocolate doughnuts I just dunked the tops in chocolate ganache. To make ganache, just melt 1 & 1/2 cup semi-sweet chocolate chips with 1/2 cup heavy cream over medium. Stir it until smooth and transfer it to a bowl for dipping. When you dip them in the chocolate, press the doughnuts face down and lift them up and out: don't twist them.  Adorn them with colorful sprinkles, coconut flakes, or chopped nuts (I went with sprinkles!) I also added 1/8 teaspoon of nutmeg the doughnuts.  What's that? You have a lot of chocolate ganache leftover? Don't say it like it's a bad thing! It goes great with ice-cream or crepes.


What do doughnuts go great with? Coffee and friends! I got this precious giraffe mug at World Market and it comes in a set of four; enough for your friends. My favorite drink at Starbucks is a white mocha latte. Rather than spending 4-5 dollars on coffee everyday, I came up with a quick fix. I put 10-15 white chocolate chips in the bottom of my mug and pour the hot coffee over it. It's not quite the same thing as Starbucks, but it satisfies my craving. 

Oh la la. Doughnuts are easy to make and should be properly love and adored, otherwise you have no business making them in the first place. 

Peace and love. XXX.


Wednesday, December 31, 2014

One Less Smart Mouthed Kid

I had my wisdom teeth out yesterday and aside from desperately trying to avoid dry sockets, I have not been doing much of anything. Right now, I'm trying to get full on beef broth while binge-watching  30 Rock. My diet consists of GoGo Squeez applesauce and ice-cream soup, which is exactly what you think it is.  Now I'm sitting here with a swollen face, reminiscing about French press lattes and toasted English muffins topped with hot capocollo.  I began to flip through my December edition of Bon Appetit Magazine, but didn't feel like driving myself crazy looking at all the pictures of food I couldn't eat.

Let me tell you why I absolutely love my French press. I'm one of three coffee-drinkers in my house, and we've recently acquired a Keurig coffee maker. The single-cups of coffee are just really weak; they don't quite feed the bulldog. I like my coffee strong, but I know if I make a whole pot of joe I'll be the only drinking it. I like being able to make a personal pot of coffee as strong as I like it.

I use a MR. COFFEE French press which is cool because it's large enough to make a pot to share and it has a really good filter. The first French press coffee I had was made by a boy who had no idea what he was doing, using a press with a terrible filter. There were grounds floating all around my coffee, but he was so proud of his work that I couldn't say anything. In addition to an awesome filter, this press comes with an electric milk frother. I've been making more lattes than I really need.

Bottom line: coffee is important and having your wisdom teeth out is definitely not fun.


Peace and love. XXX.